Introduction
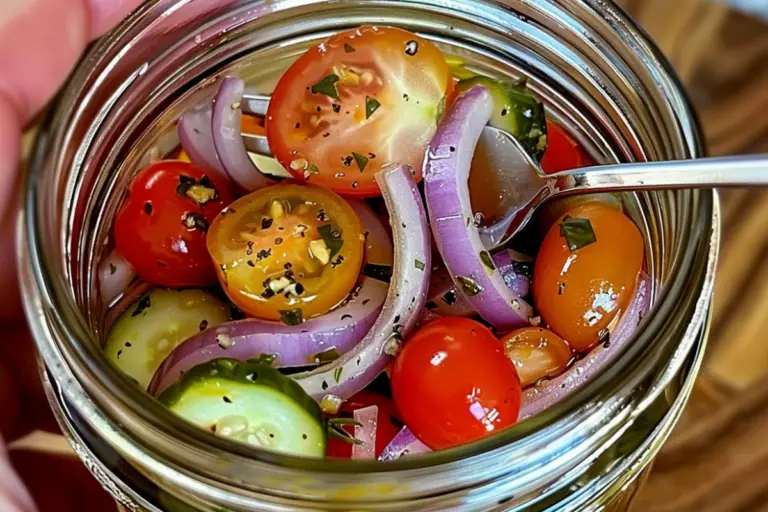
Pickled cherry tomatoes are a delightful addition to any meal, offering a burst of tangy flavor that complements a variety of dishes. This versatile recipe is not only easy to prepare but also serves as a fantastic way to preserve the fresh taste of cherry tomatoes year-round. Whether you’re looking to enhance your salads, sandwiches, or simply enjoy a savory snack, these quick pickled cherry tomatoes are the perfect solution. Plus, with the added benefit of being an easy pickled vegetable recipe, you’ll find yourself making these time and time again.
With just a few simple ingredients and minimal equipment, you can create a jar of these tangy treats in no time. The process involves sterilizing a mason jar, preparing the vegetables, making a flavorful pickling brine, and combining everything to create a delicious and colorful jar of pickled cherry tomatoes. Let’s dive into the detailed steps and make this tasty treat together.
What You’ll Need
Equipment
Before diving into the pickling process, gathering the necessary equipment is crucial. Having the right tools at hand ensures a smooth and efficient preparation. Here’s what you’ll need:
- Mason jar: A quart-sized mason jar is perfect for storing your pickled cherry tomatoes, red onions, and cucumbers.
- Large pot: Essential for sterilizing the mason jar and lid, ensuring they are free from contaminants.
- Tongs: Useful for safely removing the hot jar from boiling water during sterilization.
- Medium saucepan: Ideal for preparing the pickling brine. A non-reactive pan is best to avoid any unwanted chemical reactions.
- Clean towel: Necessary for air drying the sterilized jar and wiping the jar rim before sealing.
Having this equipment ready will streamline the pickling process, allowing you to focus on creating your delicious pickles.
Ingredients
With the equipment ready, it’s time to gather the ingredients. These ingredients will make your pickled cherry tomatoes, red onions, and cucumbers burst with flavor. Here’s what you’ll need:
- 1 cup cherry tomatoes, halved: Fresh, ripe cherry tomatoes are the main ingredient. Halving them allows the brine to penetrate effectively, enhancing their flavor.
- 1 cup red onions, thinly sliced: Red onions add sweetness and crunch. Thin slices ensure they pick up the brine quickly.
- 1 cup cucumbers, thinly sliced: Cucumbers provide a refreshing, crisp texture. Thin slices are essential for an even pickling process.
- 1 cup white vinegar: This is the base of your pickling brine, giving the pickles their tangy flavor.
- 1 cup water: Water dilutes the vinegar slightly, balancing the acidity.
- 2 tablespoons sugar: Adds a touch of sweetness, balancing the tanginess of the vinegar.
- 1 tablespoon salt: Essential for flavor and preservation.
- 2 cloves garlic, smashed: Adds a robust, aromatic flavor to the pickles.
- 1 teaspoon mustard seeds: Provides a slight bite and complexity to the flavor.
- 1 teaspoon black peppercorns: Adds a subtle spiciness that enhances the overall taste.
By preparing these ingredients in advance, you ensure a smooth and efficient pickling process. The combination of these elements will give your pickled cherry tomatoes, red onions, and cucumbers a delightful and balanced flavor.
Preparation
Preparing your ingredients and equipment in advance is key to a successful pickling process. Here’s a quick checklist to ensure you’re ready:
- Wash and dry the mason jar and lid: Ensuring they are clean prevents any contamination.
- Sterilize the jar and lid: Boil them in a large pot of water for 10 minutes. Use tongs to remove them and place them on a clean towel to air dry.
- Halve the cherry tomatoes: This allows the brine to penetrate and enhance their flavor.
- Thinly slice the red onions and cucumbers: Even slices ensure that all the vegetables pickle at the same rate.
With everything prepped, you are now ready to move on to the actual pickling process. This preparation ensures that when you start pickling, the process is smooth and efficient, leading to delicious results.
Instructions
Sterilize the Jar
Sterilizing your mason jar is a crucial first step in the pickling process. Proper sterilization ensures that your pickled cherry tomatoes, red onions, and cucumbers remain safe to eat and free from harmful bacteria. Here’s how to do it:
- Wash the Jar and Lid: Start by washing the mason jar and lid with hot, soapy water. Rinse thoroughly to remove any soap residue.
- Boil the Jar and Lid: Place the jar and lid in a large pot of water, ensuring they are fully submerged. Bring the water to a boil and let it boil for 10 minutes. This process kills any lingering bacteria and prepares the jar for pickling.
- Dry the Jar: Use tongs to carefully remove the jar and lid from the boiling water. Place them on a clean towel and let them air dry. Ensure the jar is completely dry before you begin packing it with vegetables.
By following these steps, you ensure that your jar is properly sterilized and ready for the next stage of the pickling process.
Prepare the Vegetables
With your jar sterilized, it’s time to prepare the vegetables. Proper preparation ensures that your pickled cherry tomatoes, red onions, and cucumbers absorb the brine evenly and develop a balanced flavor.
- Halve the Cherry Tomatoes: Use a sharp knife to cut each cherry tomato in half. This allows the brine to penetrate the tomatoes more effectively, enhancing their flavor.
- Slice the Red Onions and Cucumbers: Thinly slice the red onions and cucumbers. Thin slices ensure that the vegetables pickle quickly and evenly, providing a consistent texture and taste.
Layer the Vegetables
- Organize Your Ingredients: Arrange your halved cherry tomatoes, sliced red onions, and sliced cucumbers in separate bowls. This makes the packing process more efficient.
- Create a Colorful Layer: Begin packing the jar by layering the vegetables. Start with a layer of cherry tomatoes, followed by a layer of red onions, and then a layer of cucumbers. Repeat the layers until the jar is full, leaving about half an inch of headspace at the top.
Pack the Jar
Once your vegetables are prepared, it’s time to pack them into the sterilized jar. Proper packing ensures that the brine can circulate and pickle the vegetables evenly.
- Add the Vegetables: Carefully place the halved cherry tomatoes, sliced red onions, and sliced cucumbers into the sterilized jar. Pack them tightly but not so tightly that the brine cannot circulate.
- Create Layers: For a visually appealing jar, alternate layers of cherry tomatoes, red onions, and cucumbers. This layering not only looks beautiful but also ensures a mix of flavors in every bite.
By packing the jar carefully, you ensure that your pickled vegetables will be evenly brined and delicious.
Serving & Storage
Serving Suggestions
Pickled cherry tomatoes, red onions, and cucumbers are versatile and can be used in a variety of dishes. Here are some delightful ways to enjoy your pickles:
- As a Snack: Enjoy them straight from the jar for a tangy, refreshing snack. The combination of flavors makes them a delicious and healthy alternative to traditional snacks.
- In Salads: Add them to your favorite salads for an extra burst of flavor and crunch. They pair well with leafy greens, feta cheese, and a light vinaigrette.
- Garnish for Sandwiches and Burgers: Use these pickles to top sandwiches and burgers. They add a tangy twist that complements meats, cheeses, and spreads.
- Side Dish: Serve them as a side dish with grilled meats or roasted vegetables. Their acidity helps to balance richer dishes.
These serving suggestions highlight the versatility of pickled vegetables, making them a must-have in your kitchen.
Storage Tips
Proper storage ensures that your pickled cherry tomatoes, red onions, and cucumbers remain fresh and flavorful. Here’s how to store them:
- Refrigeration: Once cooled to room temperature, store the jar in the refrigerator. The cool temperature helps to preserve the pickles and maintain their crispness.
- Use Clean Utensils: Always use a clean utensil when removing pickles from the jar. This prevents contamination and extends the shelf life of your pickles.
- Shelf Life: Properly stored, these pickles can last up to one month in the refrigerator. The flavors continue to develop over time, so they often taste even better after a few days.
By following these storage tips, you can enjoy your pickled vegetables at their best.
Frequently Asked Questions
How long do pickled cherry tomatoes last?
Pickled cherry tomatoes, red onions, and cucumbers can last up to one month in the refrigerator if stored properly. Ensure that the jar is sealed tightly and always use a clean utensil to avoid contamination. Over time, the flavors will continue to develop, often becoming more complex and delicious.
Can I use a different type of vinegar for pickling?
Absolutely! While white vinegar is a common choice due to its neutral flavor, you can experiment with other types of vinegar to add unique flavors to your pickles. Apple cider vinegar adds a fruity note, rice vinegar brings a subtle sweetness, and red wine vinegar offers a robust, rich flavor. Feel free to mix and match to find your preferred taste profile.
What are the best ways to serve pickled cherry tomatoes?
There are many delicious ways to enjoy pickled cherry tomatoes, red onions, and cucumbers. They are fantastic in salads, adding a tangy crunch. Use them as a garnish for sandwiches and burgers to elevate your meal with a burst of flavor. They also make a great snack on their own or a refreshing side dish paired with grilled meats or vegetables.
Can I add other vegetables to this pickling recipe?
Yes, you can definitely add other vegetables to this pickling recipe. Bell peppers, carrots, and cauliflower are excellent additions that bring their own unique flavors and textures. Just make sure to slice them thinly to ensure they pickle evenly with the cherry tomatoes, red onions, and cucumbers.
T hese FAQs cover the most common questions about pickling cherry tomatoes and other vegetables, helping you achieve the best results and enjoy your pickles to the fullest.
Do you boil the brine and pour it over the vegetables once they are in the jar? Or do you put cold brine over the vegetables then seal and put the sealed jars
In boiling water? If so how
Long?
For the pickled veggies, you should boil the brine first and then pour it over the vegetables in the jar. After sealing, process the jars in boiling water for about 10 minutes. This helps ensure they’re properly preserved.